Configure Workflow Rules
Workflow rules define which outbound messages trigger actions. When INKY detects conditions you specify, it applies the actions you choose.
Written By Matt Sywulak
Last updated About 2 months ago
Creating a Rule
Navigate: Admin Center → Outbound Protection Settings Outbound Protection - INKY
Click: Add Rule
Configure conditions and actions (see below)
Save
Setting Conditions
Use the rule editor to define what triggers the rule:
Condition Logic:
Toggle between AND (all must match) and OR (any can match). Some conditions only support OR; for those the editor shows a static OR badge in place of the toggle.
Combine multiple conditions for precision
If you to trigger when the condition is not matched use the negation icon to the left.
Checkbox conditions carry an information icon. Hover or click it for a short description of what the condition matches.
Available Conditions:
Data Types - Credit cards, SSNs, passports, bank accounts, medical info, crypto addresses
Email Headers - Subject, from, to, custom X-INKY-Workflow headers
Bracketed Subject - Match a subject line that is wrapped in a chosen bracket style, the common convention for asking that a message be encrypted
Content Patterns - Custom regex for specific phrases or formats
Workflow Headers - Match internal routing signals (e.g., "outside") Use your Google or Microsoft rules to add the header X-Inky-Workflow with your custom values.
Example: Detect SSNs AND external recipients:
Workflow Header: Matches "outside" Data Type: Matches "National IDs" 
Bracketed Subject
The Bracketed Subject condition matches a subject line that is wrapped in brackets. Many organizations already ask senders to flag a message this way when they want it encrypted, and this condition lets an outbound rule act on that convention directly.
Bracket style. Select one or more of Square Brackets [ ] (the default), Pipes | |, or Curly Braces { }. A subject has only one outermost pair, so these values are always combined with OR and the editor shows a static OR badge instead of the AND/OR toggle.
The whole subject must be wrapped. A subject that opens with a bracketed word but continues afterwards does not match.
Reply and forward prefixes are ignored. Re:, Fw:, Fwd: and their localized equivalents (AW:, SV:, TR:, WG: and others) are stripped before matching, including chains such as Re: Fw:, so replies within an encrypted thread keep matching the rule.
Only the outermost characters are checked, so repeated or unbalanced brackets still match.
Examples, with Square Brackets [ ] selected:
[Confidential report]— matchesRe: [Confidential report]— matches; the reply prefix is stripped first[Secure Info] Attached— no match; the bracket must close at the end of the subjectQuarterly report [confidential]— no match; the subject must start with the bracket[Confidential report)— no match; the closing character must match the selected style

Note: Bracketed Subject is off by default. Contact INKY support to enable it for your team.
Data Type Exclusions
When you add a Data Types condition to a rule, you can configure exclusions per data type. Exclusions let you avoid triggering the rule for specific patterns or contexts—for example, detecting SSNs while excluding certain formats or use cases.
How to access: Select the Data Types condition in the rule editor. Exclusion options appear for each data type you add.

Per-data-type configuration — Each data type (e.g., SSNs, credit cards, passports) has its own exclusion settings. Configure exclusions separately for each type.
Context filter — A context filter is shown only when it applies to the selected data type. Use it to narrow or broaden when the exclusion applies.
Info tooltip — An info icon next to exclusions explains how they work and how to configure them.

Note: Exclusions are scoped to each data type independently. Exclusions for one data type do not affect others.
Setting Actions
Choose what happens when conditions match:
Sender Confirm - User approves their own message
Approval Required - Designated approver must review
Encrypt - Automatically send via encryption portal
Action Order: If multiple rules trigger, actions apply in this order:
Sender Confirm
Approval Required
Encrypt
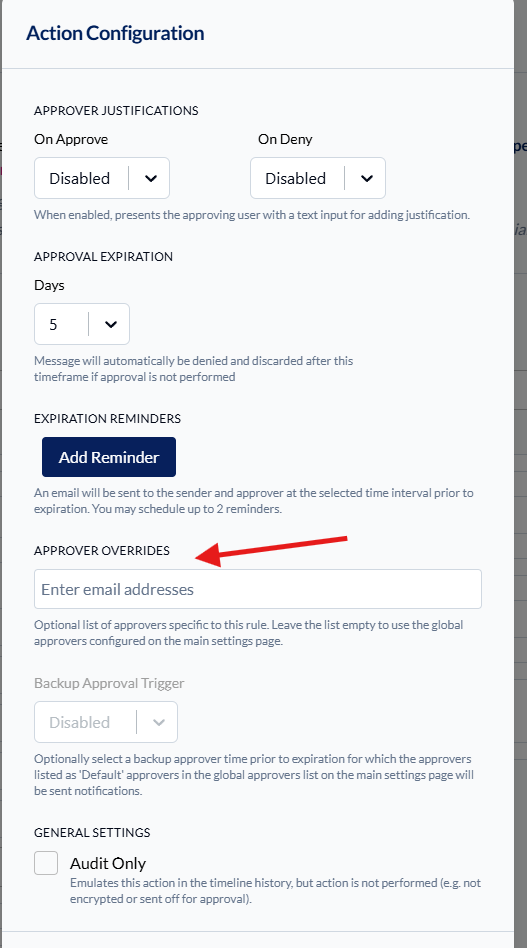
Rule-Level Approvers
Override global approvers for specific rules:
Add Approval Required action
Click gear icon on the action
Select Approver Overrides
Choose specific approvers for this rule
Backup Triggers
For rule-level approvers, set backup notifications:
Triggers X hours before approval expires
Sends notification to default approvers
Prevents messages from timing out
Example: 72-hour approval window, 8-hour backup trigger = default approvers notified at 64 hours if no approval yet.
Default Rules
INKY provides two disabled rules to start:
Personally Identifiable Information - Detects IDs, licenses, passports
Business Related Information - Detects financial and medical data
Enable and customize these or create your own.
Workflow headers
You are able to set your own custom conditions using a workflow header. Use the internal routing features of our mail environment to add the header X-Inky-Workflow
X-Inky-Workflow
Example rule in Microsoft o365 to tag mail being sent to an all company mailing list

Best Practices
Start narrow - Begin with high-risk data types, expand gradually
Test first - Use audit for new rules before performing actions
Monitor results - Review triggered rules in Workflow Portal
Was this helpful?
Still need help? Ask the team